Have you ever wanted to mine Ergo but thought you might not have the technical knowledge? Surprisingly, it is not as inaccessible an activity as you might have thought. Whether you are a novice or experienced crypto miner, it is actually quite easy to mine Ergo. In our previous blog post, we offered steps on how to mine Ergo on Windows (Mining Ergo on Windows). With this article, we will guide readers through the steps of mining Ergo with the popular crypto mining operating system, HiveOS.
You do not necessarily need to have a mining rig to mine Ergo. If you have a personal PC with a compatible GPU, you can easily mine Ergo and earn passive income.
You will need the following to mine Ergo:
- a computer (or mining rig) with a GPU video card that has a minimum of 4GB of RAM (ideally more if within your budget)
- An external SSD or USB key (minimum 6 GB) to create a bootable drive - this writer has had greater success using HiveOS on an SSD but many miners also use a USB key.
- an Ergo wallet (such as Nautilus)
- a HiveOS account - we will guide you through setting this up.
Let’s start by getting your HiveOS account.
- Go to the following website: https://the.hiveos.farm/login
- You will see a login screen with the following message below it: “Don’t have an account yet? Register”
- Select “Register”
- Once prompted, complete the form with your email, a login name and a password.
Once you have created your account, you will be asked to verify your email and then be offered the opportunity to enable Two Factor Authentication (2FA) for stronger security. When finished with 2FA, you will see the following screen:
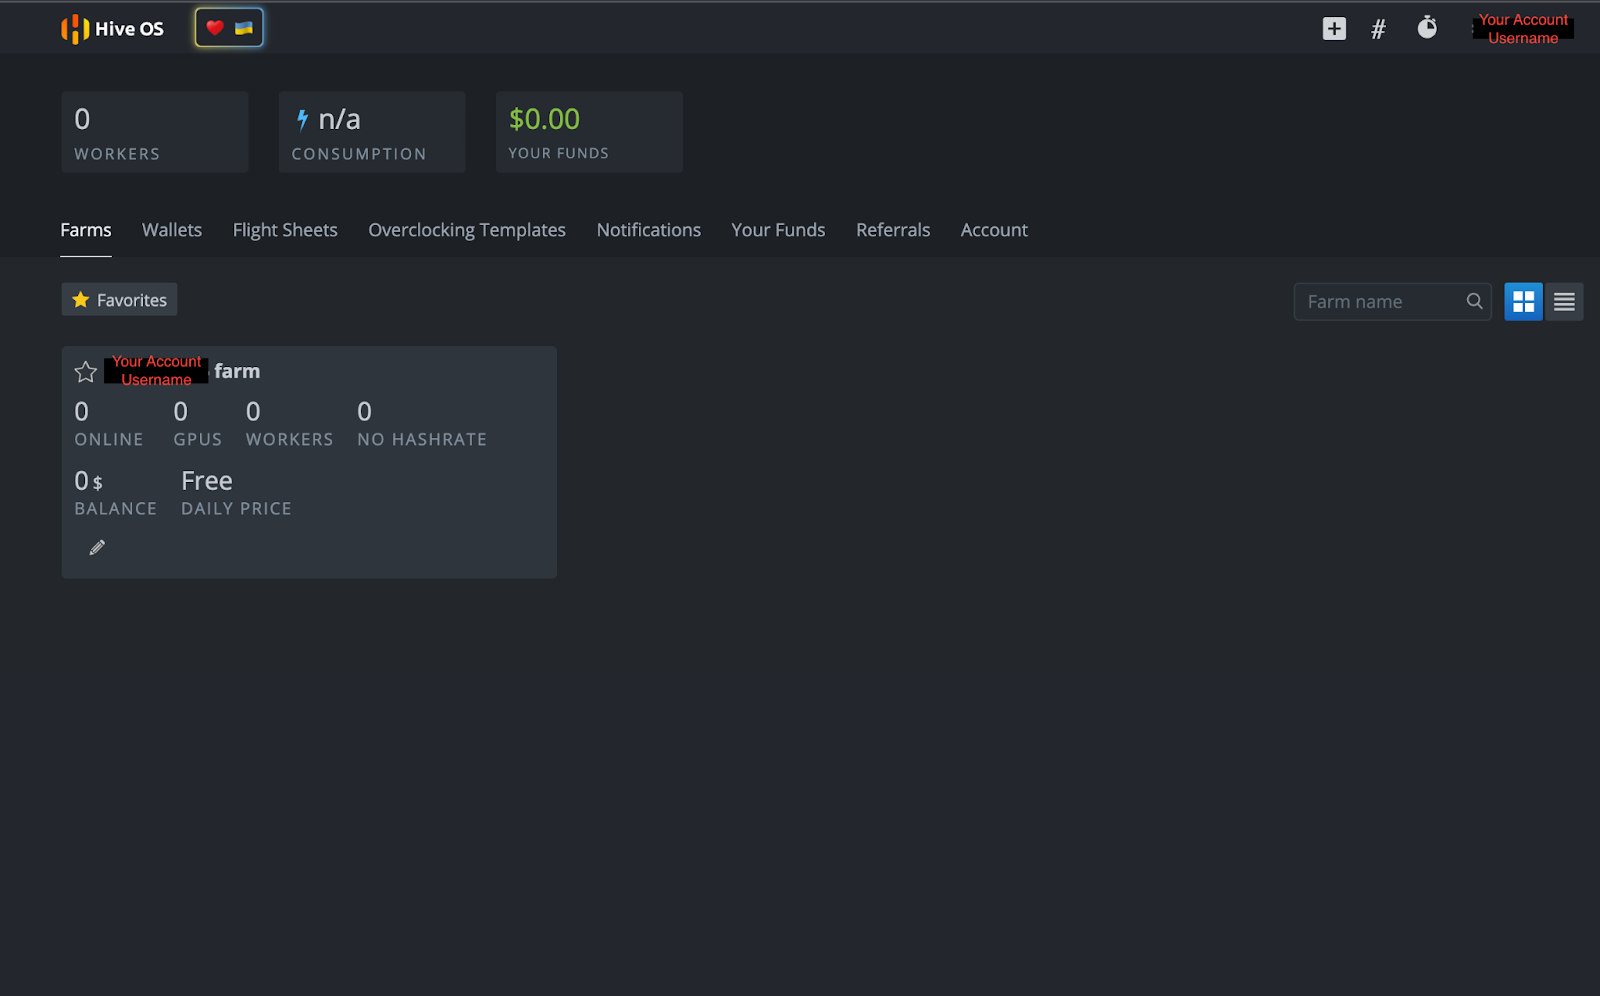
Because HiveOS is a dedicated crypto mining operating system, the user interface allows access to numerous features, including power consumption, overclock settings, remote power access and other crypto mining actions. Users can also control all of these features remotely on a smartphone with the HiveOS app.
Creating a HiveOS Bootable Drive
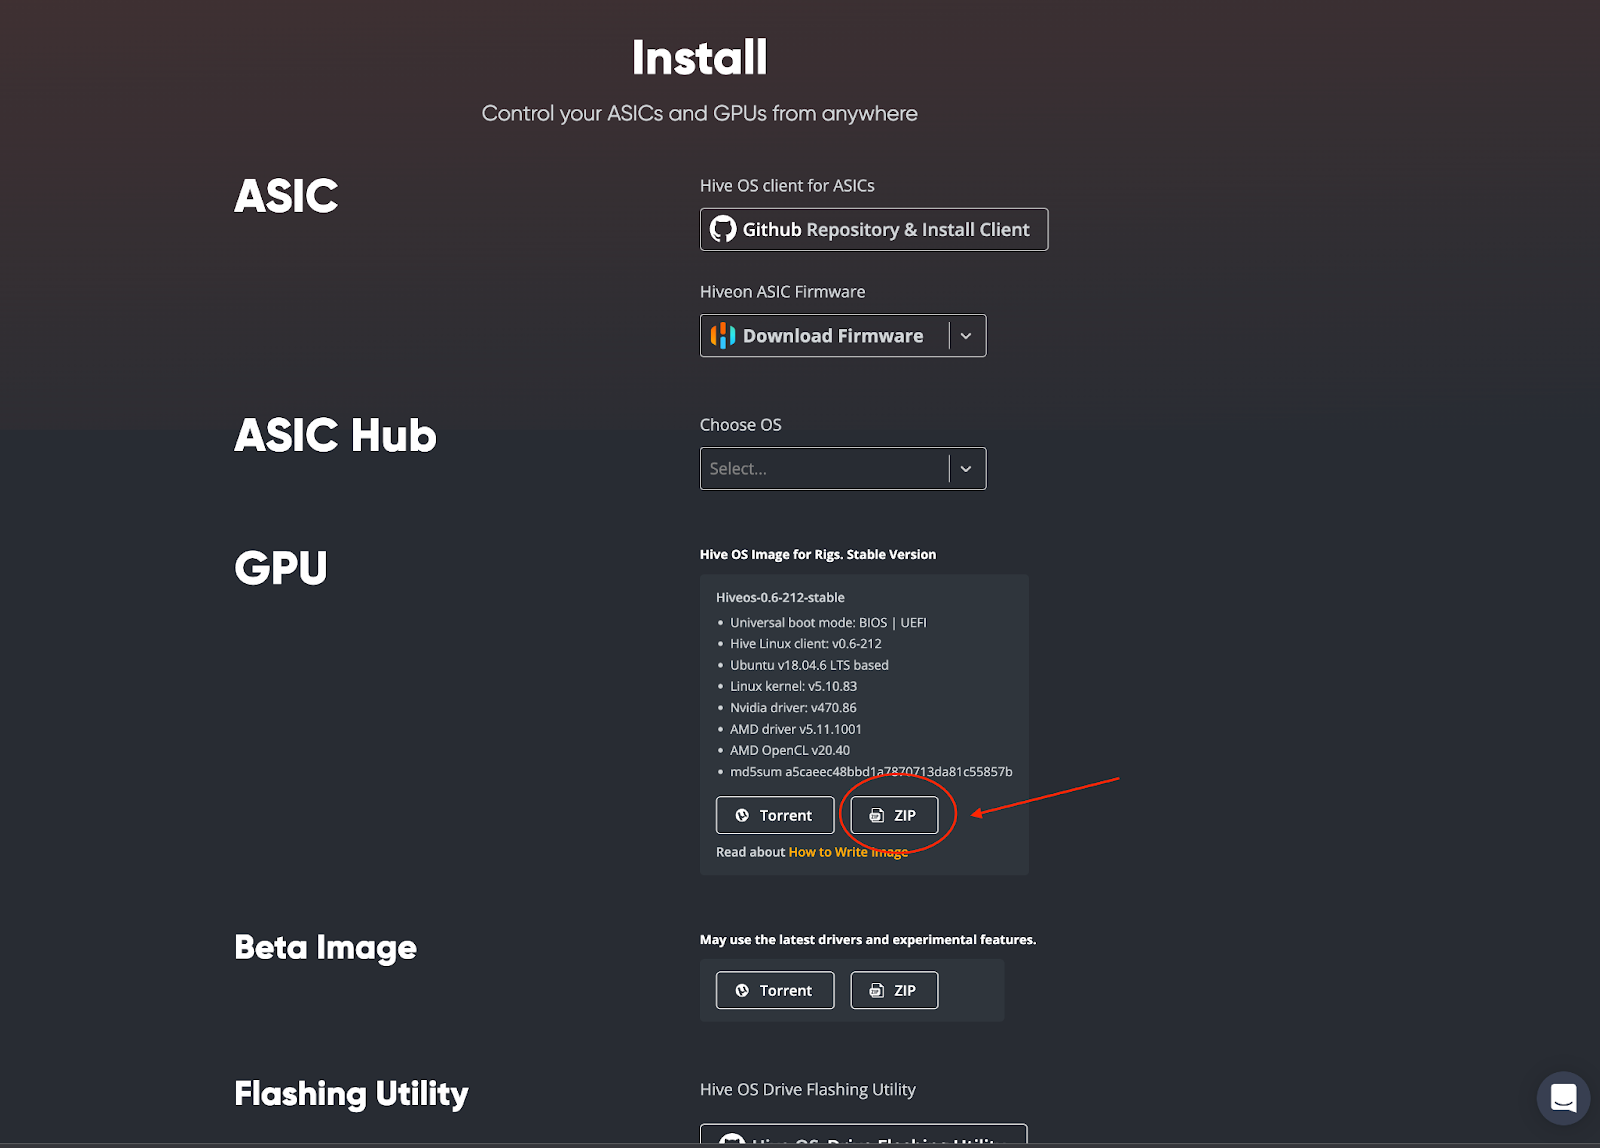
Now that you have your HiveOS account, you need to create a bootable drive for the operating system. Go to https://hiveon.com/install/ and download the ZIP file under the “GPU” category.
Once downloaded, you will need to flash the operating system onto your external SSD or USB key. This writer chose to use balenaEtcher for creating the bootable drive and readers can access that open source software here: https://www.balena.io/etcher/. Download and install the balenaEtcher software on your computer. Once completed, open balenaEtcher on your computer. You will see the following screen:
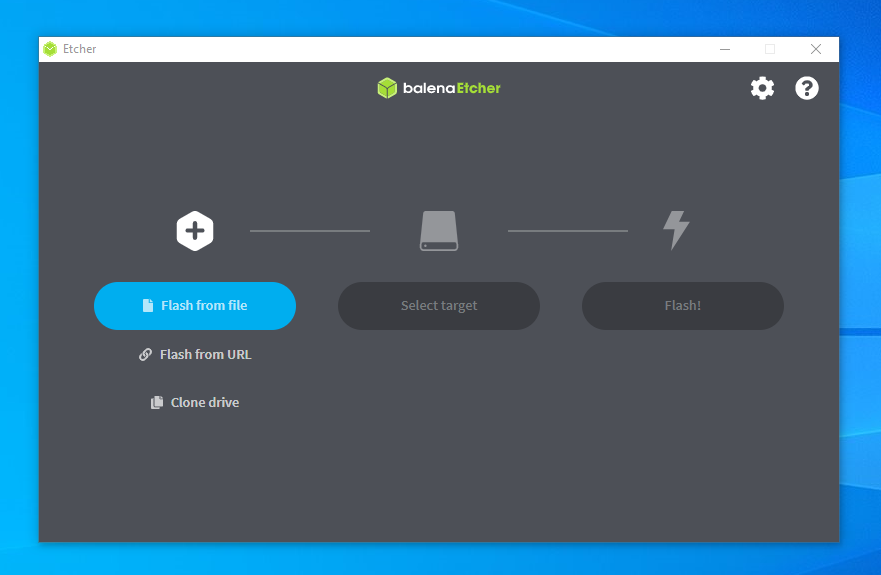
You will then follow these steps:
- Select “Flash from file” - you will choose the downloaded HiveOS file (ex. hiveos-0.6-212-stable@211201.img.xz)
- Then click on “Select target” - you will chose your external SSD or USB key
- Finish the process by selecting “Flash!”
That’s it! You now have HiveOS installed on your bootable drive. We have just a few things left to set up in your HiveOS account before we can start mining so let’s go back to your account page.
Setting Up Your Miner
On your HiveOS account page, click on your farm name:
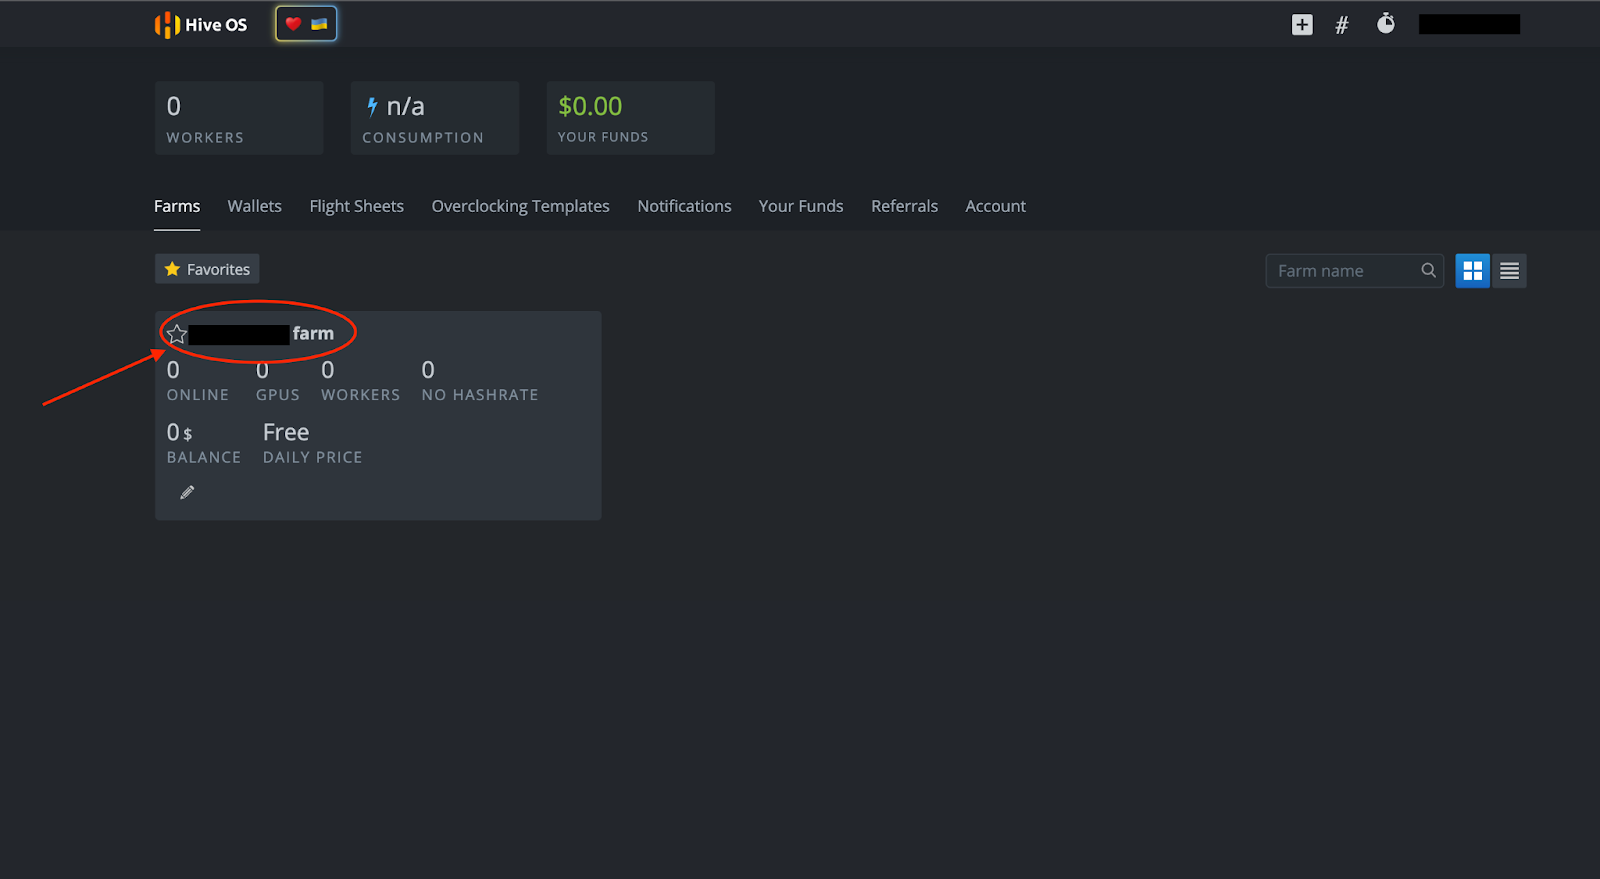
You will see the following page below. From here you can set up your miner by selecting “+ Add Rig” or the “+” symbol at the top of the page.
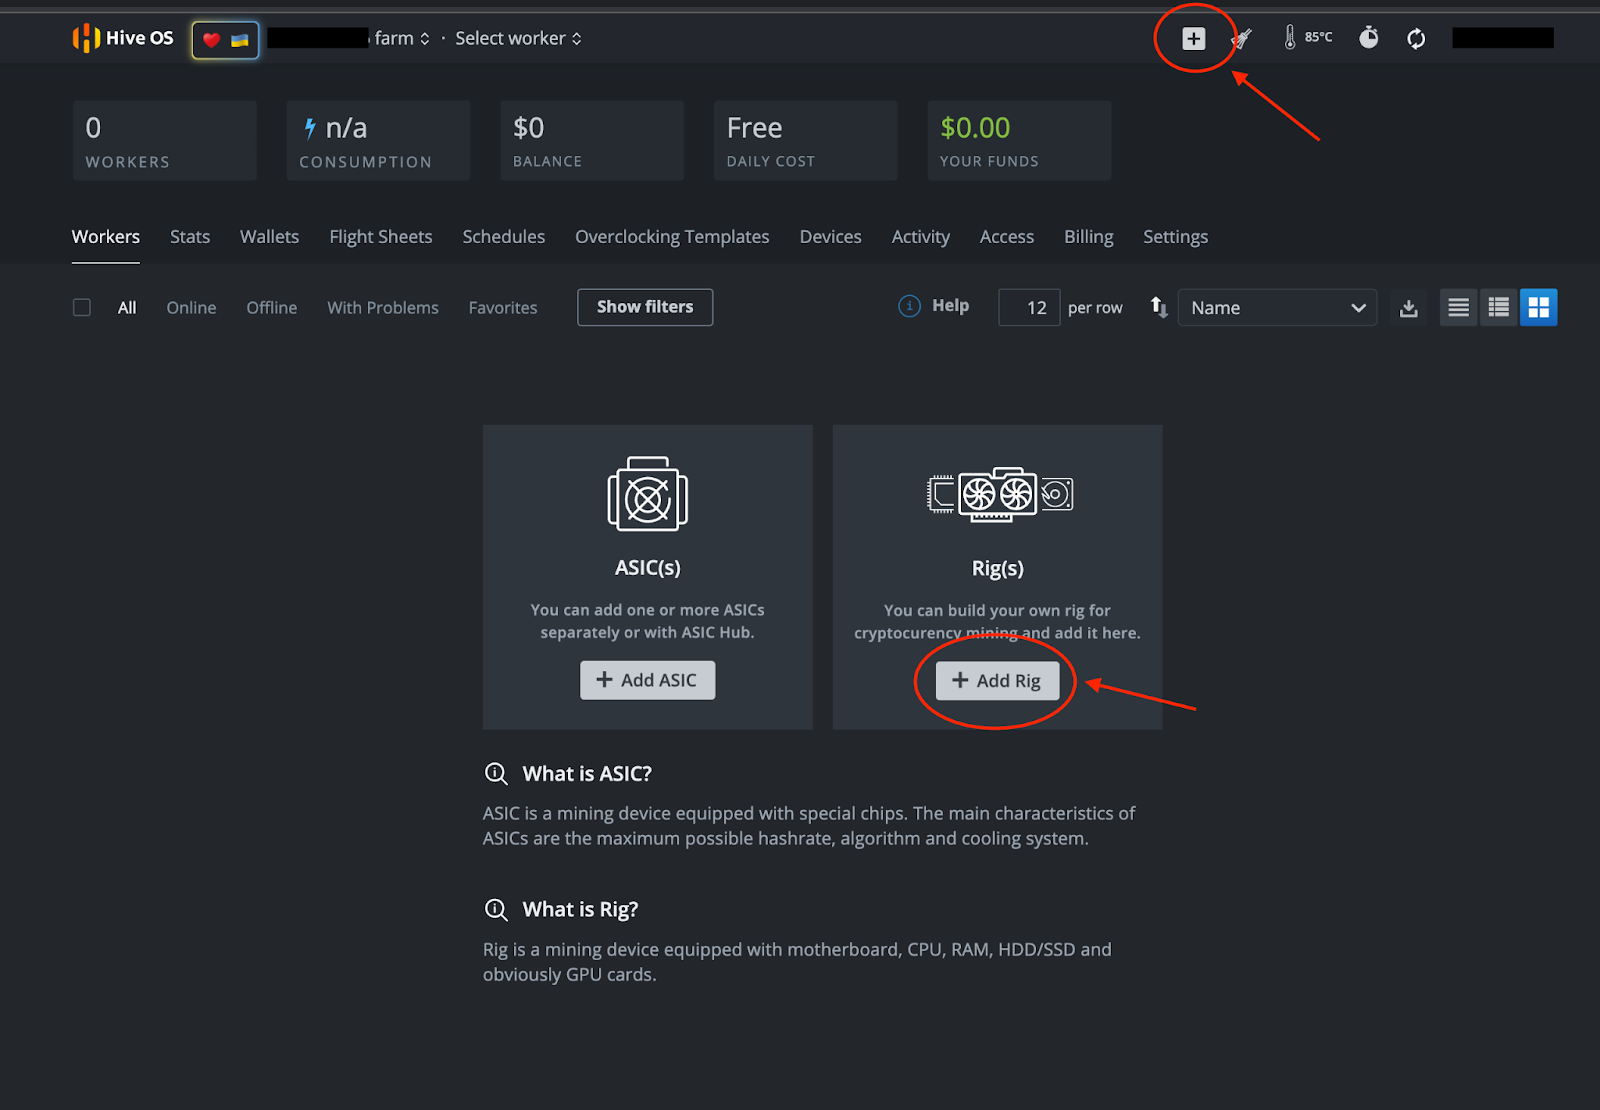
Follow these steps:
- Select “+ Add Rig”
- On the next screen, select “Connect existing”
- IMPORTANT: Write down the Rig ID and password (you will need to click on the eye symbol to see the password) that you see on the next page:
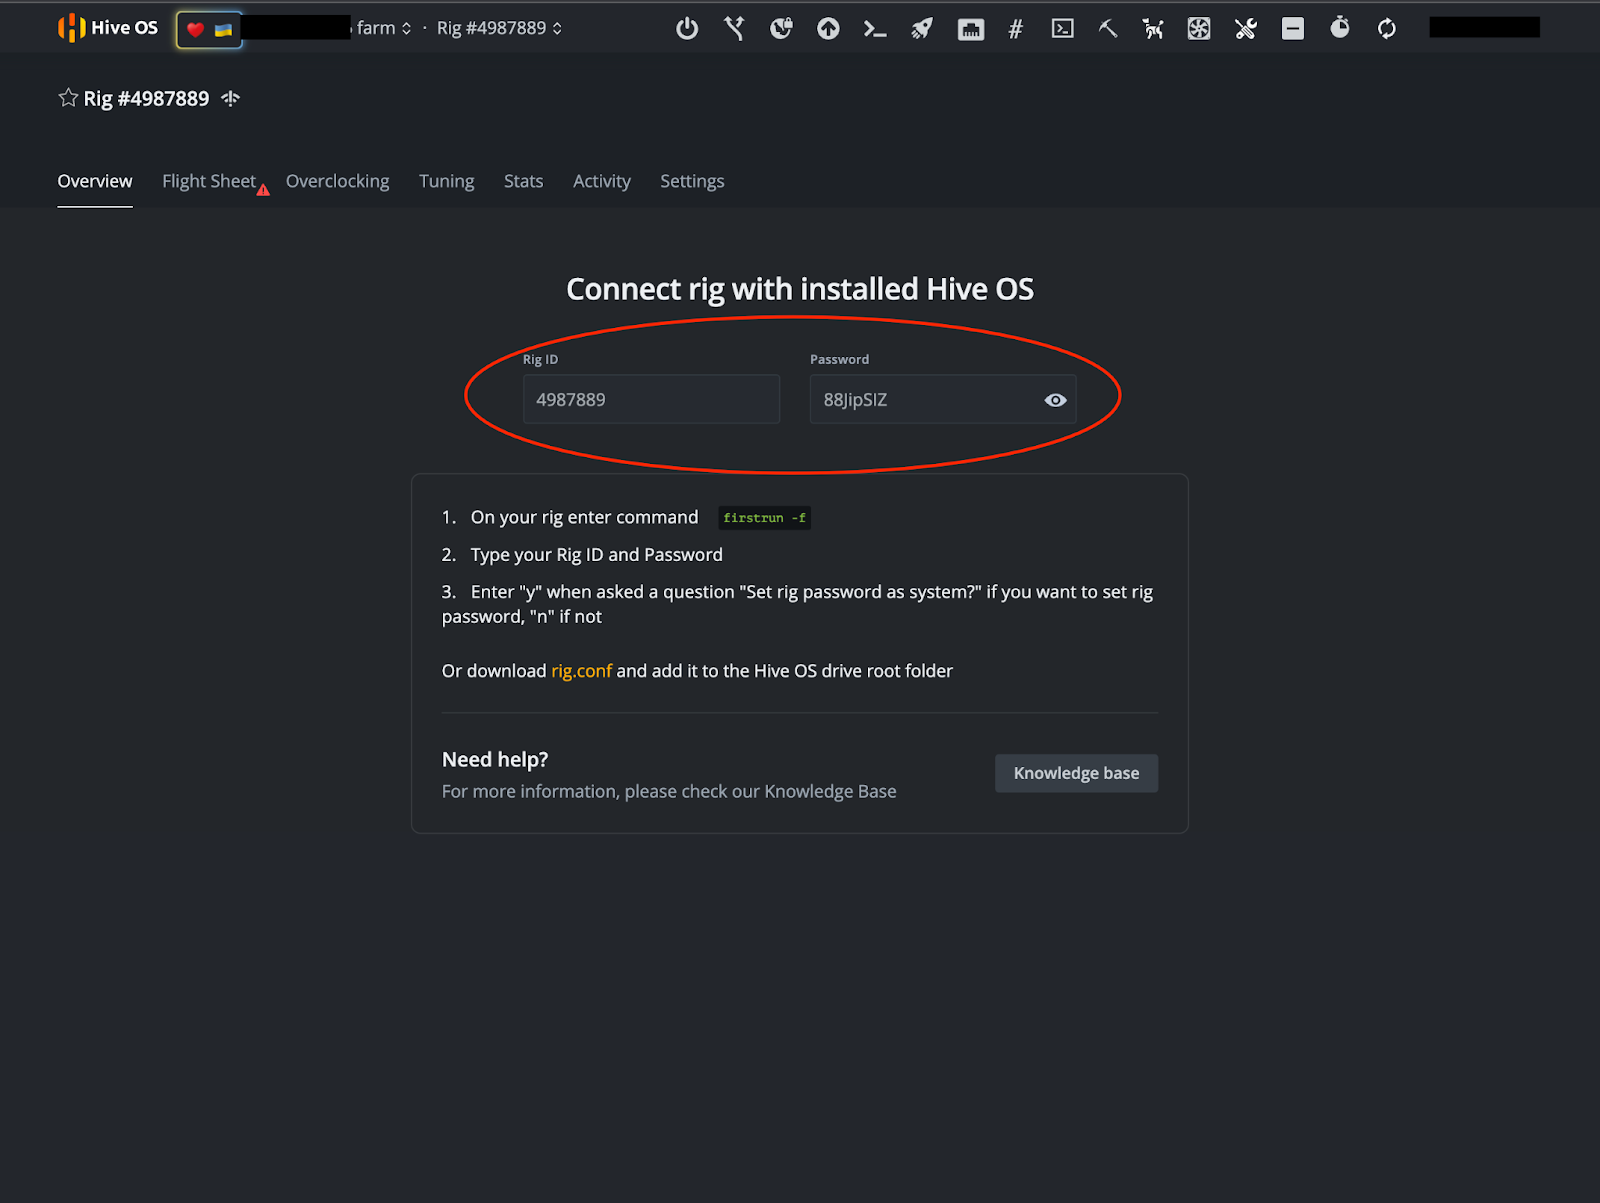
Note: This is not a demonstration account and is not an operational miner.
Wallet and Flight Sheet
Once you have taken note of your Rig ID and Password, it is time to set up your wallet and Flight Sheet. In the above image, you will see a “Flight Sheet” tab near the top right of the screen. After you select that tab you will be prompted to “Go to list.”
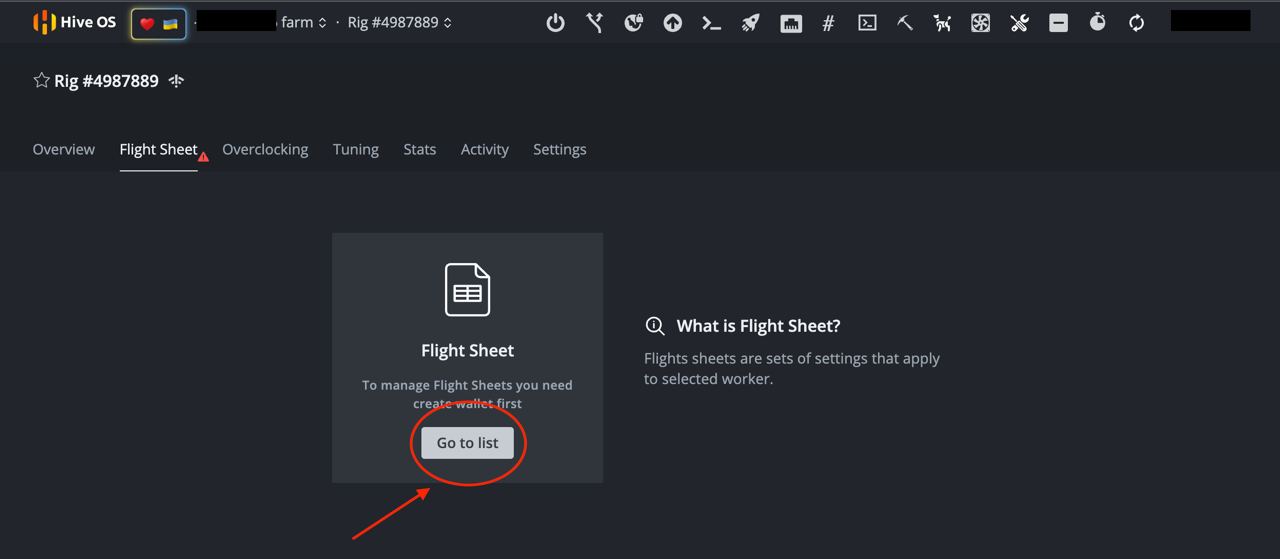
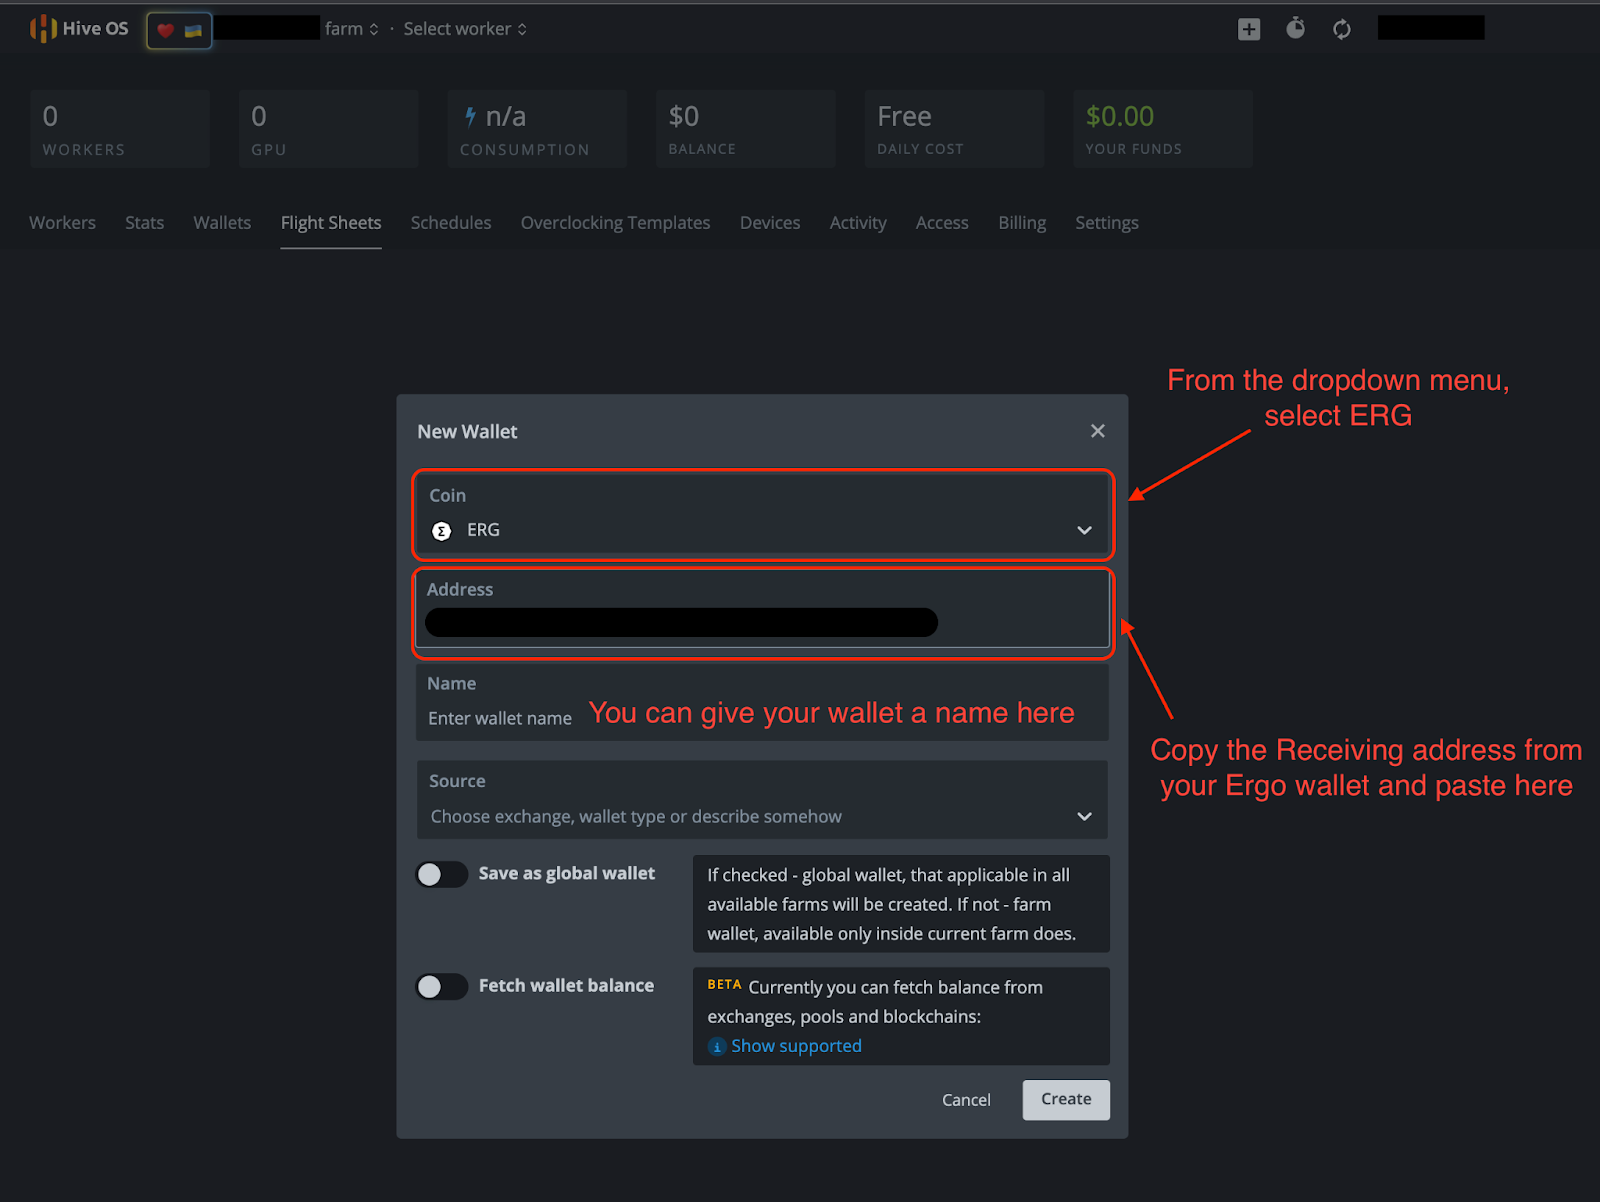
Select “Go to list” and click on “+ Add Wallet.” From there, you will fill in the necessary information in the image below.
- Coin: ERG
- Address: Your Receiving address from your Ergo wallet.
- The other details are optional.
- Click “Create”
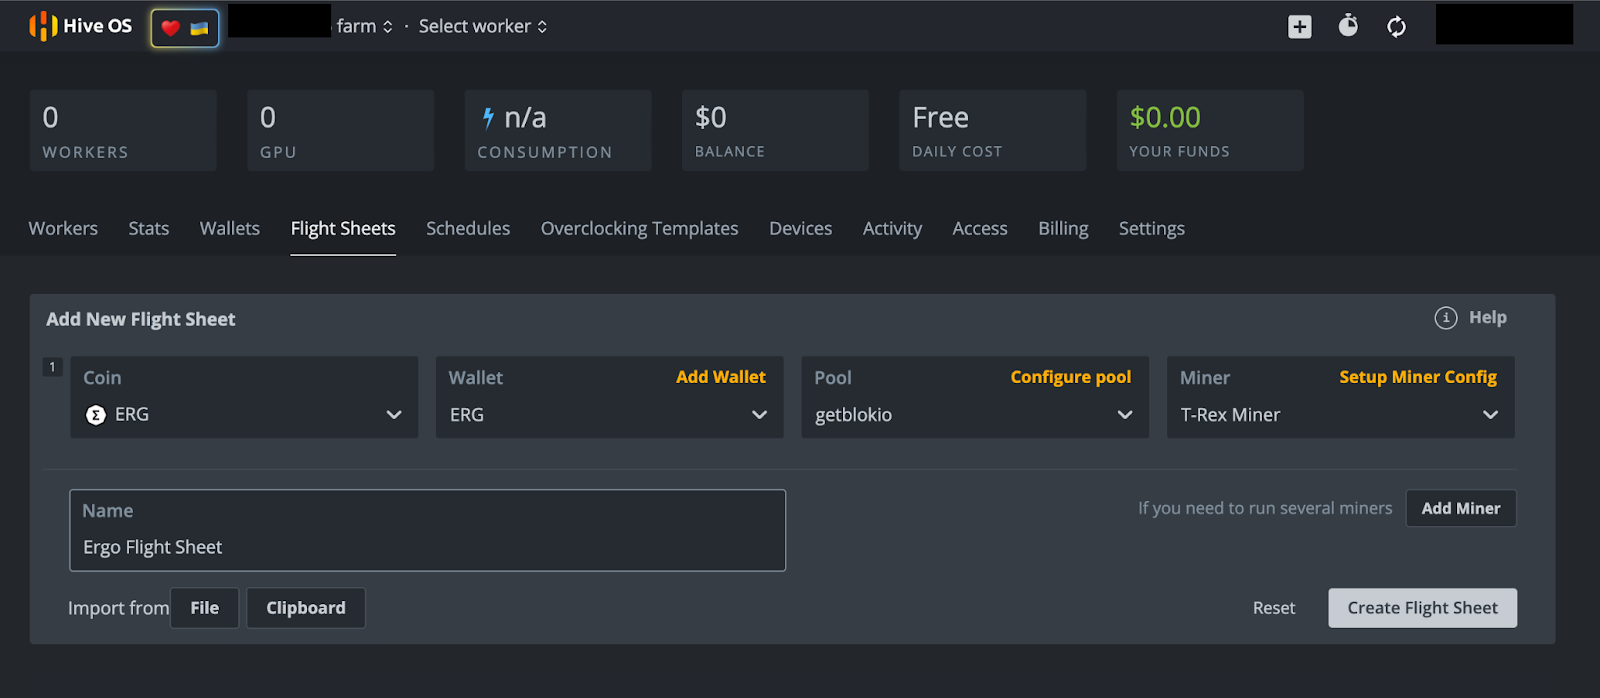
After you click “Create,” you will be brought back to the Flight Sheet page. From there, select the “+ Add Flight Sheet” option and fill out the following in the next screen (example in the image below).
- Coin: ERG
- Wallet: From the dropdown menu select your Ergo wallet.
- Pool: You have numerous options here. This writer has selected Getblok mining pool but you will have several other pools to choose from under the dropdown menu. When choosing a pool, it is often encouraged to choose a smaller pool with less hashrate than the largest pool. This helps to distribute the hashrate and limit the chances of a 51% attack. This can happen if one mining pool receives 51% (or more) of the network’s hashrate, creating a scenario that could potentially compromise the security of the blockchain.
- Miner: From the dropdown menu you will have several options. Choose “T-Rex Miner” for Nvidia GPU’s or “TeamRedMiner'' for AMD GPU’s.
- Name: Give your Flight Sheet a name - it can be whatever you wish.
- Select “Create Flight Sheet”
Mining
Let’s get mining!
If you are mining from a rig, be sure that your new HiveOS bootable drive is connected to your rig. If you are using your personal computer, make sure you have your HiveOS bootable drive connected before turning on your computer.
Turn on your computer and hold down the button to enter BIOS. This button is typically any of the following: F1, F2, F10, DELETE, or ESC. Once you are in BIOS, select the HiveOS bootable drive under the Boot option. If you have trouble accessing these settings, the following article offers an overview on how to reboot your computer from another drive.
Since this will be the first time you have initiated your miner in HiveOS, you will need to input the Rig ID and Password that you wrote down earlier. Just wait for HiveOS to finish loading and you will be prompted for that information. If you are not prompted after waiting for a few minutes, type “firstrun -f” and hit ENTER. The operating system will ask if you want to change your miner password after you type in the password that was initially provided. You can select “Y” (Yes, change password) or “N” (do not change password).
There is just one last step and it requires that you go into your HiveOS account. If you were accessing this account from the computer you are trying to mine from, we recommend using the HiveOS mobile application to access your HiveOS account.
- Select the name of your farm.
- Select the Rig #. For the purposes of this demonstration, the rig number we have been showing in the above images is 4987889. Please note, your rig number will be unique to your HiveOS account.
- Select the “Flight Sheet” tab.
- On the next screen, you will see a rocket ship symbol next to the Ergo Flight Sheet you created. Click on the rocket ship to assign the flight sheet to your miner.
- Your miner is now mining Ergo.
Conclusion and Overclocking
As was mentioned earlier in this article, you can enjoy full remote access to your miner from the mobile app. If you have taken the time to set up this miner, you should make the most of your GPU’s capabilities.
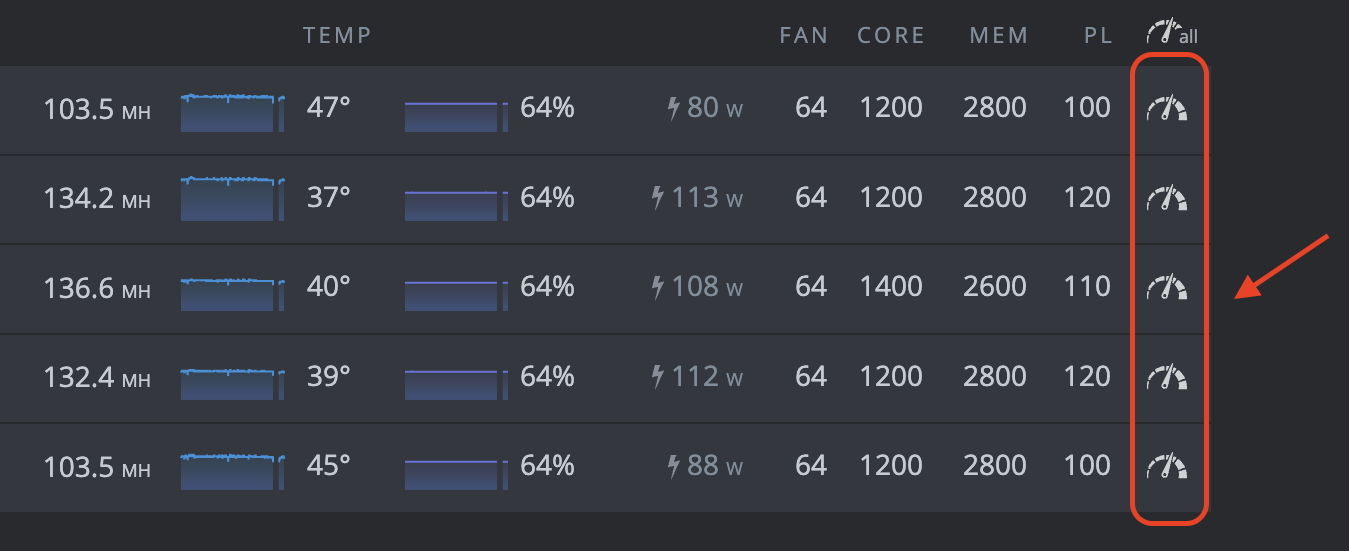
You can click on any of these clock symbols to access the overclock settings for each of your GPU’s. For detailed overclocking guides, please refer to the Ergo Mining Telegram Channel. That channel contains an overclocking guide in the pinned messages.
That’s it! This may seem like a lot of steps but once you have this all set up, the HiveOS software provides convenient access to your miner. Happy mining! You should start to see ERG deposited in your Ergo wallet within 1-2 days (depending on your hashrate).
Share post

November 28, 2025


November 24, 2025


October 12, 2025

September 30, 2025


August 13, 2025


July 9, 2025

May 12, 2025


December 9, 2024